Introduction#
RustDesk is an out-of-the-box open-source and free remote desktop software for all platforms, including MacOS, Windows, and Android clients. It can replace remote desktop services such as "Sunflower Remote Desktop" and "ToDesk", allowing you to have full control over your data without worrying about security issues. You can choose to use the official registration/relay server or set up your own server, or even develop your own version based on the official code.
Deploying the Service#
Environment Preparation#
-
The server needs to have Docker and DockerCompose installed.
-
Create persistent directories and compose description files.
# Create folders
mkdir -p /home/rustdesk-server
cd /home/rustdesk-server
mkdir hbbr
mkdir hbbs
# Create description file and paste the contents of step 3
vim docker-compose.yml
version: '3'

networks:
  rustdesk-net:
    external: false

services:
  hbbs:
    container_name: rustdesk-hbbs
    ports:
      - 21115:21115
      - 21116:21116
      - 21116:21116/udp
      - 21118:21118
    image: rustdesk/rustdesk-server:latest
    # Please change www.xxxaaa.cn:21117 to your own domain name
    # If you want to prevent users without a key from establishing unencrypted connections, add -k _ when running hbbs and hbbr
    command: hbbs -r www.xxxaaa.cn:21117 -k _
    volumes:
      - ./hbbs:/root
    networks:
      - rustdesk-net
    depends_on:
      - hbbr
    restart: unless-stopped

  hbbr:
    container_name: rustdesk-hbbr
    ports:
      - 21117:21117
      - 21119:21119
    image: rustdesk/rustdesk-server:latest
    command: hbbr
    volumes:
      - ./hbbr:/root
    networks:
      - rustdesk-net
    restart: unless-stopped
Running the Containers#
Common docker-compose commands:
# Run the containers
docker-compose up -d
# Stop the containers
docker-compose stop
# Start the containers
docker-compose start
# Restart the containers
docker-compose restart
# Take down (delete) the containers. Deleting the containers will not cause data loss, as your database is saved in the data folder in the current directory. Please keep this directory safe.
docker-compose down
Viewing the Server Public Key#
In the above docker-compose file, it has been declared that forced key encryption authentication is enabled, and all devices that need to connect to the server must provide the correct public key to connect successfully.
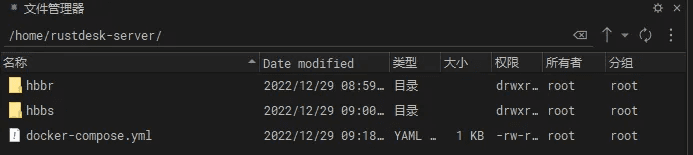
Here is the directory structure of the folder where the docker-compose file is located:
.
├── docker-compose.yml
├── hbbr
│   ├── id_ed25519
│   └── id_ed25519.pub
└── hbbs
    ├── db_v2.sqlite3
    ├── db_v2.sqlite3-shm
    ├── db_v2.sqlite3-wal
    ├── id_ed25519
    └── id_ed25519.pub
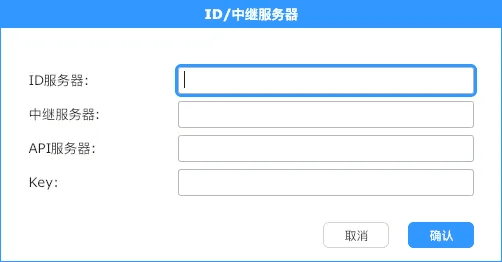
After the container is started, the public and private keys will be automatically generated. We need to copy the string inside the id_ed25519.pub file in the hbbs directory. This is the credential we need to connect to the server.
If you need to change the key and public key, simply delete the id_ed25519.pub and id_ed25519 files in the hbbs folder and restart the container to automatically regenerate them.
Configuring the Client#
General Configuration#
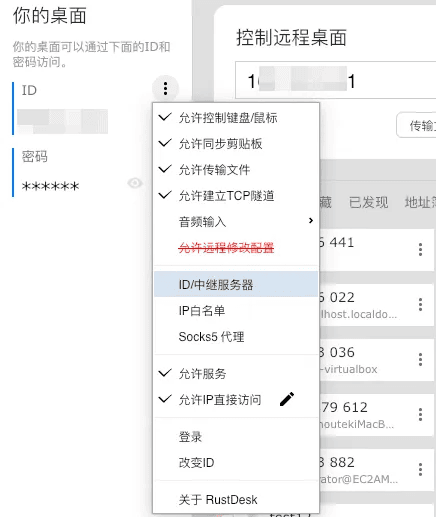
Note: The controlled end only needs to fill in the server IP address, while the controlling end needs to fill in the key to initiate the connection.
In the settings interface of the client, we can enter the server IP address and the key file. After saving, the client will prompt that it is ready.
Automatic Configuration#
Key verification is only required when initiating a connection from the controlling end.
This way, we can send the controlled end to anyone without worrying about key leakage or unauthorized users initiating connections.
After setting up, we can send the controlled end to the person we want to remotely assist, and they don't need to do any configuration. They just need to open the software and send us the software's ID and password, and we can remotely access their device.
If you need unattended access, that is, automatically running the remote software on startup to facilitate remote connections, you can directly open the controlled end software, click install, and the software and configuration will be installed on the device together.
If you want the client to run without manually entering the relay address and key, you can achieve this by modifying the filename of the client.
We rename the client:
Controlled end
host=ServerIP,key=IncorrectKeyContent.exe
For example: host=129.129.33.8,key=111.exe

Controlling end
host=ServerIP,key=CorrectKeyContent.exe
For example: host=129.129.33.8,key=4uZtPIYe4y344NP3IVc5SxRzKeiNn2lfen4tEY=.exe
Note#
Port Description#
| Component | Function | Used Ports |
|---|---|---|
| hbbs | RustDesk ID Registration Server | 21115(tcp): Used for NAT type testing 21116(udp): Used for ID registration and heartbeat service 21116(tcp): Used for TCP hole punching and connection service |
| hbbr | RustDesk Relay Server | 21117(tcp): Used for relay service |